
I found this on Pinterest!
Haven't made them yet but they are sooooo C.U.T.E. & look really easy!
A special thanks to Amy at Then She Made.... http://thenshemade.blogspot.com/2011/01/sock-snowmen.html.
Even though I took the liberty of copying & pasting her post to my page, Amy deserves (& gets) all the credit. I hope you visit & join her blog...I did!
She is so very talented!!!
**************************************************************
Sock Snowmen

You'll need the following:
1- white sock. Use one that has a mid-calf or knee high tube on the top.
decorative socks (the argyle ankle socks shown plus many other styles are at Target for $1)
Rice for filler
twine or ribbon
rubberbands
buttons
something for the nose (I used the top of a bbq stick that I painted orange)

Step 1: cut the foot part off of your sock and discard. You only need the tube part. This is great if you have socks that are worn or have holes in them.

Step 2 & 3: Turn the tube part of your sock inside out and wrap a rubber band around the bottom. Make sure it is wrapped tightly. Then turn it inside out again so the rubber band is on the inside.

Step 4 & 5: Fill the sock with rice. Be sure to push the rice down as you go. This will stretch the sock a bit and make it so you get a nice plump snowman in the end. Then, close the top by wrapping another rubber band around the top as shown in the photo above.
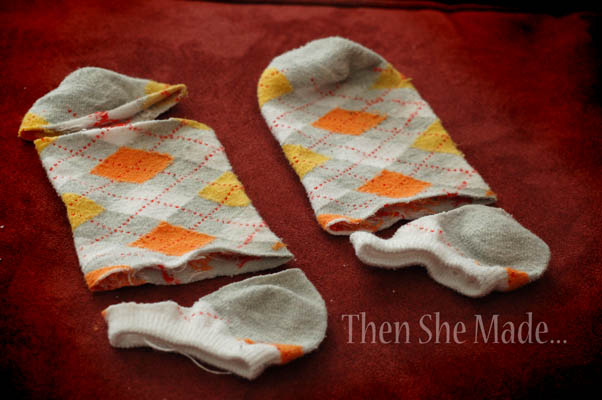
Step 6: Taking the ankle socks, cut as shown above. The first one, you'll cut off the toe and the heel. The second sock you'll just cut off the heel. And, I should note. If you have a sock that doesn't have a mate and it's a longer than an ankle sock, you can dress your whole snowman with just one sock.

Step 7, 8 & 9: First, take the sock without a toe and a heel and put it over your rice filled sock. This becomes the sweater. Then, pushing the rice down to make a solid base, tie a piece of ribbon or twine around the bottom of the sweater. Next do the same thing with the top of the sweater like shown in the middle photo above. And, last but not least, add the hat. The hat is the other sock that you cut up that still has the toe. (To make it look less like a sock, I tied some twine on the top.)

Step 10: Next you add your embellishments. Eyes, nose, buttons etc... you can sew them on if you want but I went for fast and just used hot glue.

And there you have it - the cutest, easiest, little snowman you'll ever make. I whipped this little guy up in less than 10 minutes and I didn't even get cold in the process.
Here is one of his friends: This guy was made the same way as the one above only I didn't add the twine at the bottom of the sweater.


Just some quick tips:
- you could sew the sock instead of using a rubber band.
- beans work too, don't limit yourself just to rice
- use socks that don't have mates then you don't have to buy new ones
- the argyle socks came from Target and they have a TON of different patterns for $1
- the striped socks are actually mid-calf toe socks so only need one sock instead of two
- you can add mushed up potpourri to the inside so it will smell good too.
Thanks Amy for the GREAT tutorial!
♥'s
Sherry
What darling snowmen! Thanks for stopping by Pretty Old Houses and leaving a comment.
ReplyDelete